Monday, March 17, 2014

Happy St. Patty's Day...


Happy St. Patty's Day from the two doodle bugs, Harvey and Jackson!

When deciding who would wear what, my husband suggested that Harvey wear the bowtie and Jackson wear the st. patty's day ears to fit their personalities. 

I think he was right. 

Also, glad I snapped this on the first try since those ears did not last long at all. 


Saturday, March 15, 2014

Gifting {for new neighbors}


A few weeks ago, a new family moved into our neighborhood right across the street from us. We knew from when we moved in that it felt good when our neighbors welcomed us to the neighborhood, so we wanted to do the same. 


Luckily, I had all of the materials for this welcome gift on hand. I made blueberry muffins, Trader Joe's prepackaged mix, which were very easy and delicious! The packaging came from wal-mart a long time ago, the twine I already had, and the chalkboard gift tags were from the dollar section at target.

I have become obsessed with the dollar section because of the incredibly adorable things I keep finding--straws, pencils, kraft paper bags. 

Shopping the dollar section is very hit or miss, but I honestly get excited every time I go just to see what treasures I can find. 

Wednesday, March 12, 2014

{DIY} Spring Wreath


This is a super easy and quick DIY spring wreath! All of the materials are from Hobby Lobby. The spring floral, wreath, and burlap used for the ribbon were all on sale! The past few times I've been to Hobby Lobby I've also used their 40% off one item coupon that you can pull up on your phone when you check out. 

Total this wreath was approximately $10 dollars!


I loved this wreath because it had the leaves entwined. It looked more rustic, yet springy to me!

To start, I cut off the ends of the stems for the floral so they could be hidden underneath the burlap. I used hot glue to hold the floral in place. 

Then, I took a piece of burlap to wrap around the wreath and cover the stem ends, only just enough to wrap around the wreath once. 


Next, I made the burlap bow. I tried a new version, which I found on pinterest, but ended up making it up as I went along.

Basically, I folded the burlap back and forth, leaving pieces to hang down and allowing the last fold to be the middle loop. 

I recommend playing with the burlap to find a look that works for you. 

Lastly, I secured a spray painted wooden letter from Hobby Lobby. This time I used basic white. I secured the letter with a small piece of wire and hot glue. 

Here is the final product hanging from our storm door.


I'm so happy spring is {mostly} here!

Monday, March 10, 2014

Framed recipes


My grandfather is a terrific cook! When he was a prisoner of war in World War II he kept himself going by keeping a diary, which largely consisted of his favorite recipes from his mother. His mother  was Italian and immigrated from the Naples area in the early 1900's. As you can imagine, much of his cooking consists of italian classics. 


Although, I am yet to master his recipes, I decided to frame a few of his classics--
meatballs and stuffed peppers. 


He has written down majority of his recipes, which my mother now has in a book, so these framed recipes are authentically his and in his handwriting. 

Next step, mastering a few of his recipes!


Friday, February 14, 2014

Happy Valentine's Day


Happy Valentine's Day from my two love bugs! 

Hope everyone has a great day!

Thursday, February 13, 2014

{Healthy} Valentine's Day Cocktail


Lately, I've been looking for healthier cocktail options, which don't have tons of sugar. To keep flavor but loose the extra white sugar, I've been mixing cocktails with fresh juice! 


This cocktail is a mixture of the juice of a handful of cranberries, 1 apple, and topped off with proseccuo!

I use a Breville Juicer, which I got last year and love!


And of course you have to top it off with a cute straw! :-)


Hope everyone has a happy (and healthy) Valentine's Day!

Wednesday, February 12, 2014

Gallery wall tips and tricks...


A few weeks ago I finished a gallery wall along our stairway and since it wasn't as easy as I thought it would be I wanted to share what I learned along the way! 

I have been collecting frames over the past months in anticipation of this project. I ended up repurposing some frames I already had with a fresh coat of spray paint and found the majority of the others at TJ Maxx and Marshalls. 

When I started the process I thought after moving the frames around a few times, the perfect layout would unfold. I think I spent about 20-30 minutes trying to rearrange frames and then realized I needed 
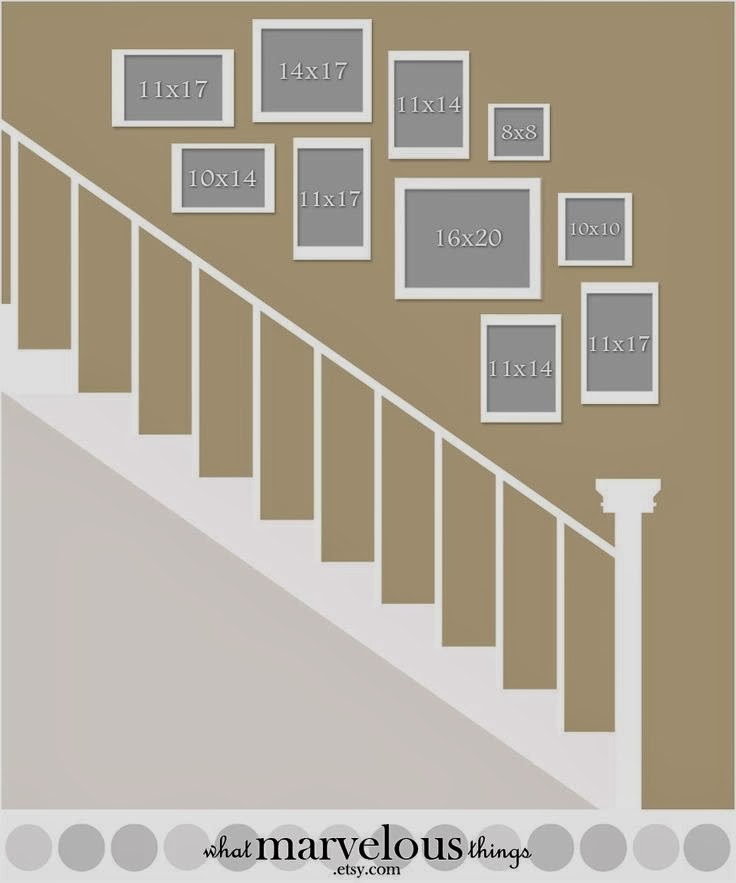
a better plan. Having a layout, like the one pictured below is tremendously helpful.


Tip #1: Have an example layout of what you want the gallery wall to look like. I found the above example on pinterest. Dainelle Sara's photography website has some great options also! 


After finding the layout, I followed the general idea and laid out the frames on the floor. I recommend laying the frames out first to make sure it looks the way you want.

Tip #2: Lay your design out on the floor first to ensure the look you want. 


Then, I traced each frame on wax paper and cut out an example of each to hang on the wall. This process is tedious but well worth it.

Tip #3: Use wax paper to trace the frames and place the desired layout on the wall. 

Using the wax paper lets you move the frames around and get the proper spacing between each. I didn't measure the spacing but eyeballed it. The wax paper also lets you easily secure the nail and tear the paper off.


Once I had the frames on the wall, I decided on the photos and artwork for each. To me it was easier to determine what I wanted with the frames on the wall, especially since the wall color and lighting may make things look different.  

Tip #4: Once your frames are on the wall, determine what photos and art you want to fill the frames. Wall color and lighting can make things look different.


I tried to use a variety of prints, art, and photos that are meaningful to us. 
I found the faith printable online.

Tip #5: Use a variety of prints, art, and photos to make the wall more interesting. Choose things that have meaning to you. 

I've seen others use objects as well in their gallery walls to give more variety. 


I chose photos with similar tones and edited all the photos used in a similar way to have consistent brightness and colors.

Tip #5: Use photos, arts, and prints with similar colors and tones for consistency throughout the gallery wall.


I made this print by using a gold ink pen and writing on black construction paper. I used a similar graphic I found on pinterest as my example.

As mentioned above, to me, choosing pieces that had meaning to us was important. I thought this simple print was a perfect reminder of the importance of gratitude! 

Tip #6: Don't be afraid to create your own pieces! Remember they don't have to be perfect.